Pages

8/31/2013

Upgrade Junos 10.0 to 12.3. Activating NSR, NSB

Junos 10.0 is not recommended and supported anymore. Latest releases add some interresting features on pure/non-mixed EX 4200 virtual-chassis like nonstop active routing, nonstop bridging and ISSU. Best choice is to upgrade to newest release during one maintenance window.


They upgraded download page, so it directly leads you to recommended version. You need priviledges to download Junos.
There is a little notice when you want to download Junos 10.4R3+. for EX 4200. I am going to incorporate content of this notice later in this blog. We need to click on text TSB15524 to download jloader file. Link to jloader files.
Notice that there has been some problem with newer hardware revisions. As mentioned on TSB15524, links are changed to right jloader files. Link to more info about this problem.


You should have read release notes for version that you are going to upgrade to. So please read 12.3 release notes. Link to Junos Software Release Notes 12.3. You should also have to download additional files like MIBs, Documentation, Radius Dictionary, etc.

Read this from Relase notes 12.3. On left click Junos OS Release Notes for EX Series Switches and then Upgrade and Downgrade Instructions for Junos OS Release 12.3 for EX Series Switches. This is the same direct link: Upgrade and Downgrade Instructions for Junos OS Release 12.3 for EX Series Switches. 

You cannot directly upgrade to 12.3:

Upgrading from Junos OS Release 10.4R2 or Earlier

To upgrade to Junos OS Release 12.3 from Junos OS Release 10.4R2 or earlier, first upgrade to Junos OS Release 11.4 by following the instructions in the Junos OS Release 11.4 release notes. See Upgrading from Junos OS Release 10.4R2 or Earlier or Upgrading from Junos OS Release 10.4R3 or Later in the Junos OS 11.4 Release Notes PDF Document.
So download latest 11.4 and jloader. Link to jloader files was mentioned before. Download Junos OS 11.4 Release Notes.

So the process looks like this:

download jloader, Junos 11.4, 12.3 ->
-> upgrade jloader -> upgrade to 11.4 and reboot -> check VC -> upgrade to 12.3 and reboot -> check VC ->
-> if not configured, configure commit synchronize, graceful switchover->
-> if VC consists of two switches, configure no-split-detection ->
-> deactivate GRES (graceful-restart) -> activate NSB -> activate NSR -> check NSR, NSB


Install jloader and Junos 11.4 from USB

Copy these files to an USB with FAT32.
 
Log to virtual-chassis (I recommend via Console)
 
Plug it to a Master switch. (MST led is green on or > show virtual-chassis

Login as root and start shell
> start shell user root

Create new directory 
% mkdir /var/tmp/usb

Mount usb
% mount -t msdosfs /dev/da1s1 /var/tmp/usb

Add jloader
% cli
> request system software add /var/tmp/usb/jloader-ex-3242-XX.Xbuild-signed.tgz
 
Add software and automatically reboot. Content of usb will be erased. All members of VC will be upgraded,
> request system software add /var/tmp/usb/jinstall.... reboot

After boot. Check system status of VC. Copy new 12.3 junos to usb, plug it in master switch, mount it and upgrade to 12.3
> request system software add /var/tmp/usb/jinstall.... reboot

How to enable NSR & NSB?

configure commit synchronize, graceful switchover (GRES)
> configure
# set system commit synchronize
# set chassis redundancy graceful-switchover
# commit
if VC consists of two switches, configure no-split-detection
# set virtual-chassis no-split-deteciton
# commit

GR and NSR cannot be enabled on the same device. Please read this link to overview what is GR and NSR.[Subscriber Management] GRES & NSR Configuration Quick Summary 
 
deactivate graceful restart (GR)
# delete routing-options greceful-restart

GR could be enabled under protocols like bgp. Show where GR is configured
# show | display set | match graceful-restart
# set protocols bgp graceful-restart
# delete protocols bgp graceful-restart
# commit 

activate NSB, activate NSR
# set routing-options nonstop-routing
# commit
# set ethernet-switching-options nonstop-routing
# commit

ISSU
Just read following link. There is a lot to do. ISSU is basically a technology that upgrades VC members one after another to minimalize downtime. Best achieved if your links are aggregated trunks spanning through multiple members.

check NSR, NSB
Check this link on how to check NSR and NSB. [Subscriber Management] GRES & NSR Configuration Quick Summary

That is all.

How to move some system directory to another disk

This blog post is not much networking related and it is a modified sequence that proposed by my chef. There could be errors. Feel free to correct me in comments.

In this tutorial I am going to move /usr directory to a new physical disk. Reason of moving this directory is because there is no much space left on /dev/sda1. System used is Ubuntu Server 10.4.

Login as root:
$ sudo su -

Command to check how to see how much space do left on /dev/sda1 (root directory: /)
$ df -H

Format disk sdb1 with ext3. Same as is sda1. Partitions should have been created on sdb [1]
$ mkfs -t ext3 /dev/sdb1

Stop as much proccesses as you can. So copying files is more "safe".
$ ps aux | more
$ netstat -tulpn | more
$ killall <processname>
$ kill <processid>

Make new directory on a root directory
$ mkdir /usrtmp

get disk UUID [2]
$ ls -l /dev/disk/by-uuid
or
$ blkid

modify /etc/fstab. Add line like this [3]
UUID=aabbccdd-eeff-1234-5678-abcdef01234 /usrtmp  ext3  relatime,errors=remount-ro  0  1
  
mount disk to directory /usrtmp.
$ mount /dev/sdb1 /usrtmp
 
copy files from /usr to /usrtmp (for example via Midnight Commander - mc) and preserve Attributes or

$ copy -pR /usr/ /usrtmp/

erase content of original /usr (via mc) or
$ rm -rf /usr

umount new disk

$ umount /usrtmp


change /etc/fstab

UUID=aabbccdd-eeff-1234-5678-abcdef01234 /usr  ext3  relatime,errors=remount-ro  0  1

remount it to /usr
$ mount /dev/sdb1 /usr


References:
[1] https://help.ubuntu.com/community/InstallingANewHardDrive#Partition_The_Disk
[2] http://liquidat.wordpress.com/2007/10/15/short-tip-get-uuid-of-hard-disks/
[3] https://help.ubuntu.com/community/Fstab

6/19/2013

Juniper EX mac-based VLANs

Juniper EX mac-based VLANs

Hi All,

Imagine that you have to assign a VLAN to a device that is not capable of sending a tagged frames. You can assign VLAN based on a MAC address or a MAC address OUI (first 3 octets), or mask. An example could be a VoIP phone or a set-top-box. Yes, for VoIP, you have a great functionality called Voice VLAN that could suits your scenario. But for my scenario it was not an option.
On a picture you can see three devices connected to unmanaged switch that send untagged frames. Unmanaged switch is connected to EX2200. On EX2200 you have a configuration that assign particular VLAN to specific frames:


interfaces {
    ge-0/0/0 {
        unit 0 {
            family ethernet-switching {
                port-mode access;
                vlan {
                    members 10;
                }
            }
        }
    }
}

protocols {
    dot1x {
        authenticator {
            static {
                00:15:c5:f5:d1:d1/48 {
                    vlan-assignment 11;
                }
                00:1c:c4:00:00:00/24 {
                    vlan-assignment 78;
                }
            }

            interface {
                ge-0/0/0.0 {
                    supplicant multiple;
                }
            }
        }
    }
}
vlans {
    v11 {
        description "PHONE";
        vlan-id 11;
    v78 {
        description "VIDEO";
        vlan-id 78;
    }
}


This will "set" vlan 11 to a device with MAC 00:15:c5:f5:d1:d1 and vlan 78 to addresses 00:1c:c4:00:00:00/24. Interface is configured for mode access so PC is automatically taged to default vlan 10. Uplink port configuration is not included. To show a vlan assigment use show vlans, show dot1x interface


Here are some references.

End notes:

4/08/2013

Testing how much routes a device could handle with Quagga

Hi,

I wanted to stress-test multilayer switch Juniper EX 4200 and its routing engine. Somehow. I wanted to simulate a number of BGP routes and how will switch react. Importing and filtering BGP routes to Adj-RIB-In table and then to routing table could be stressfull for device and this could lead to 100% cpu usage and for example OSPF adjacency flapping. Most of work in this blog is done by a route generator script. You could also use a spreadsheet editor (Excel) and then edit exported text to create routes in Quagga configuration file.

 What do you need?
  • router (EX4200 with a advanced license. But don't worry. BGP on EX4200 should work even without license. At least it used to work on older releases. It yelds message to console during commit  and regularry to syslog)
  • standard Linux or Ubuntu PC with NIC and Quagga
  • ethernet cable :-)

Juniper EX 4200 specifications [2]

IPv4 Unicast routes: 16,000

Install and configure Quagga on a Ubuntu PC
# apt-get install quagga

Change Ubuntu IP addresses
# ifconfig eth0 192.0.2.1/24

 Edit Quagga configuration file ...
# nano /etc/quagga/daemons

... and you should run at least these two Quagga daemons
zebra=yes
bgp=yes

How to generate many routes
I used script from this site V. Glinsky[1] blog.
Change these two lines in that script:

my $router_id="192.0.2.1"; #bgp router-id
my $remote_ip="192.0.2.2"; #BGP neighbor ip address


Leave other values unchanged. It is going to generate 300,000 routes. Much more than 16,000. Let's say we are all right with AS numbers. Ubuntu AS65099, Juniper AS65001. Actually I generated 599999 routes in my example.
 
Copy generated bgpd.conf file to a directory /etc/quagga/.

Here is how bgpd.conf should look
hostname quagga-host
password zebra
enable password zebra
line vty
router bgp 65099
  bgp router-id 192.0.2.1
  neighbor 192.0.2.2 remote-as 65001
  network 70.0.0.0/24
  network 70.0.1.0/24
  network 70.0.2.0/24
  network 70.0.3.0/24 


Run Quagga
# /etc/init.d/quagga restart

Configure Juniper BGP protocol and interface
root@ex4200> show configuration protocols bgp 
local-as 65001;
group bgp-test {
    type external;

    peer-as 65099;
    neighbor 192.0.2.1;

}


root@ex4200> show configuration interfaces ge-0/0/0   
unit 0 {
    family inet {
        address 192.0.2.2/24;
}


root@ex4200> show configuration routing-options
router-id 192.0.2.2;
autonomous-system 65001; 


There is a warning during commit. You should have a license. Don't worry, it's OK for now. It will work even without it.
{master:0}[edit]
root@ex4200# commit
[edit protocols]
  'bgp'
    warning: requires 'bgp' license
configuration check succeeds
commit complete 

Connect two devices with ethernet cable and observe results
Juniper EX 4200:

root@ex4200> show bgp summary  
Groups: 1 Peers: 1 Down peers: 0
Table          Tot Paths  Act Paths Suppressed    History Damp State    Pending
inet.0             
                   16372      16372          0          0          0          0
Peer                     AS      InPkt     OutPkt    OutQ   Flaps Last Up/Dwn State|#Active/Received/Accepted/Damped...
192.0.2.1             65099        299          4       0       0          28 16372/16372/16372/0  0/0/0/0

BGP neighbor adjacency status is Established. Highlighted is number of accepted routes in a Adj-Rib-In table. We don't use any import policy.

root@ex4200> show route

inet.0: 16384 destinations, 16384 routes (16384 active, 0 holddown, 0 hidden)
+ = Active Route, - = Last Active, * = Both

2.0.0.0/24         *[BGP/170] 00:00:39, MED 0, localpref 100
                      AS path: 65099 I, validation-state: unverified
                    > to 192.0.2.1 via ge-0/0/0.0
2.0.1.0/24         *[BGP/170] 00:00:39, MED 0, localpref 100
                      AS path: 65099 I, validation-state: unverified
                    > to 192.0.2.1 via ge-0/0/0.0
2.0.2.0/24         *[BGP/170] 00:00:39, MED 0, localpref 100
                      AS path: 65099 I, validation-state: unverified
                    > to 192.0.2.1 via ge-0/0/0.0
2.0.3.0/24         *[BGP/170] 00:00:39, MED 0, localpref 100
                      AS path: 65099 I, validation-state: unverified
                    > to 192.0.2.1 via ge-0/0/0.0
2.0.4.0/24         *[BGP/170] 00:00:39, MED 0, localpref 100
                      AS path: 65099 I, validation-state: unverified
                    > to 192.0.2.1 via ge-0/0/0.0
2.0.5.0/24         *[BGP/170] 00:00:39, MED 0, localpref 100
                      AS path: 65099 I, validation-state: unverified
                    > to 192.0.2.1 via ge-0/0/0.0
2.0.6.0/24         *[BGP/170] 00:00:39, MED 0, localpref 100
---(more)---


Highlighted number is number of active routes in routing table.
 

root@ex4200> show chassis routing-engine
Routing Engine status:
  Slot 0:
    Current state                  Master
    Temperature                 34 degrees C / 93 degrees F
    CPU temperature             34 degrees C / 93 degrees F
    DRAM                      1024 MB
    Memory utilization          44 percent
    CPU utilization:
      User                      23 percent
      Background                 0 percent
      Kernel                    34 percent
      Interrupt                  0 percent
      Idle                      42 percent
    Model                          EX4200-24F
    Serial ID                      BR0210217636
    Start time                     2013-01-19 19:28:27 UTC
    Uptime                         31 minutes, 9 seconds
    Last reboot reason             0x2:watchdog
    Load averages:                 1 minute   5 minute  15 minute
                                       0.45       0.15       0.10

CPU utilization is a bit higher right after establishing adjacency and receiving routes.

You could also use command
> show system processes extended
to see how rpd process is using CPU [3].

Connect to Quagga and show bgp config
root@bt:~# telnet localhost 2605
Trying ::1...
Trying 127.0.0.1...
Connected to localhost.
Escape character is '^]'.

Hello, this is Quagga (version 0.99.15).
Copyright 1996-2005 Kunihiro Ishiguro, et al.


User Access Verification
 

Password:  (password is zebra or quagga)
quagga-host>
quagga-host> show ip bgp summary
BGP router identifier 192.0.2.1, local AS number 65099
RIB entries 599999, using 37 MiB of memory
Peers 1, using 2520 bytes of memory

Neighbor        V    AS MsgRcvd MsgSent   TblVer  InQ OutQ Up/Down  State/PfxRcd
192.0.2.2       4 65001       5     304        0    0    0 00:02:00        0

Total number of neighbors 1
 

quagga-host> show ip bgp neighbors
BGP neighbor is 192.0.2.2, remote AS 65001, local AS 65099, external link
  BGP version 4, remote router ID 192.0.2.2
  BGP state = Established, up for 00:02:05
  Last read 00:00:19, hold time is 90, keepalive interval is 30 seconds
  Neighbor capabilities:
    4 Byte AS: advertised and received
    Route refresh: advertised and received(old & new)
    Address family IPv4 Unicast: advertised and received
    Graceful Restart Capabilty: received
      Remote Restart timer is 120 seconds
      Address families by peer:
        none
  Graceful restart informations:
    End-of-RIB send: IPv4 Unicast
    End-of-RIB received:
  Message statistics:
    Inq depth is 0
    Outq depth is 0
                         Sent       Rcvd
    Opens:                  1          0
    Notifications:          0          0
    Updates:              298          0
    Keepalives:             6          5
    Route Refresh:          0          0
    Capability:             0          0
    Total:                305          5
  Minimum time between advertisement runs is 30 seconds

 For address family: IPv4 Unicast
  Community attribute sent to this neighbor(both)
  0 accepted prefixes

  Connections established 1; dropped 0
  Last reset never
Local host: 192.0.2.1, Local port: 179
Foreign host: 192.0.2.2, Foreign port: 60656
Nexthop: 192.0.2.1
Nexthop global: ::
Nexthop local: ::
BGP connection: non shared network
Read thread: on  Write thread: off 


Session is established. 599999 routes loaded from config file.
 
Other ways to BGP routes generation
Nice guide on how to generate routes from real world bgp routes dump:
http://evilrouters.net/2009/08/21/getting-bgp-routes-into-dynamips-with-video/ 

How to mitigate this 'attack'?
There is a command to change behavior after certain number of routes are received.
http://www.juniper.net/techpubs/en_US/junos12.3/topics/reference/configuration-statement/accepted-prefix-limit-edit-protocols-bgp.html

References:
[1] http://blog.glinskiy.com/2009/10/how-to-generate-lots-of-bgp-routes.html
[2] http://www.juniper.net/us/en/products-services/switching/ex-series/ex4200/#specifications
[3] http://www.juniper.net/techpubs/en_US/junos9.6/information-products/topic-collections/nog-baseline/routing-engine--memory-introduction.html

4/02/2013

Juniper EX simple multicast router (PIM & IGMPv2)

In next few lines I will show you how to set Juniper EX4200 switch with Junos version 12.2 to act as PIM dense-mode router. Dense mode is configured because it is simpler to configure as sparse-mode.

Background

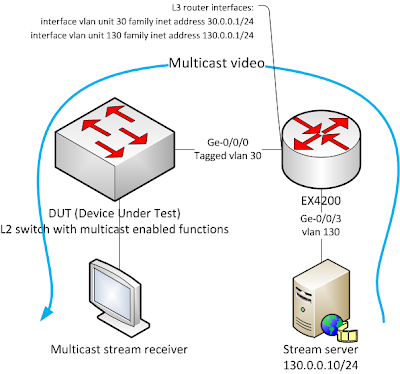
I am currently testing some L2 access switches for 3play services. Some of feature I test is a multicast service handling by switch. Especially IGMP snooping. Because of that, I need IGMP querier - a device that listens and sends IGMP packets. Simple running VLC server will not automatically listens and respond to IGMP packets from client so DUT switch will not hear and investigate IGMP snooping packets exept these from receivers (and that is not enough). You should have two-way communication to get IGMP snooping operational. I use BackTrack 5 or Ubuntu with VLC as video stream server/source and receivers. I use tagged interfaces on both devices EX 4200 ge-0/0/0, ge-0/0/1 and also on multicast stream server. DUT could be any manageable L2 switch with IGMP snooping (with or without IGMP proxy). IGMP snooping feature: http://en.wikipedia.org/wiki/IGMP_snooping. I am not going to provide IGMP snooping test here, but shortly, this feature helps reduce multicast traffic on LAN segment (VLAN), so that multicast stream is received only on interface/port/MC stream receiver that wants it, not on all ports. Switch with this feature listens to IGMP (Query, Report, Leave) packets and behave according it. Try read this http://www.juniper.net/techpubs/en_US/junos9.4/topics/concept/igmp-snooping-ex-series-overview.html or this http://www.cisco.com/en/US/docs/switches/datacenter/nexus5000/sw/configuration/guide/cli_rel_4_0_1a/IGMPSnooping.html. There is also other technology for cope somehow with multicast streams - MVR, IGMP Proxy, IGMP querier configured on switch.

Topology
Topology

Setting up a multicast stream server

All commands are run under root. You don't have to run vlc under root on Ubuntu.

(optional) install VLC
apt-get install vlc
 
(Backtrack 5) allow run VLC under root
http://www.backtrack-linux.org/forums/showthread.php?t=44590 - change file /usr/bin/vlc ... 'u should open it with an hex editor and find in file for "geteuid._libc_start_main" without quotes! when u find it change it to "getppid._libc_start_main" without quotes!'


Next five lines is a setup of vlan tagged interface on interface eth0.
Add IP address, change routing
apt-get install vconfig
modprobe 8021q
vconfig add eth0 130
ifconfig eth0.130 130.0.0.10/24
route add 224.0.0.0/4 via 130.0.0.1 dev eth0.130

run VLC stream server video
cvlc /root/Videos/MPEG-2.mpg --sout '#udp{mux=ts,dst=238.1.1.30:1234}' --ttl=4 --repeat

Juniper EX4200 configuration

## Last commit: 2013-03-28 09:55:20 UTC by root
version 12.2R2.5;
interfaces {
    ge-0/0/0 {
        unit 0 {
            family ethernet-switching {
                port-mode trunk;
                vlan {
                    members [ 30 ];


                }
            }
        }
    }
    ge-0/0/1 {
        unit 0 {
            family ethernet-switching {
                port-mode trunk;
                vlan {
                    members [ 130 ];
                }
            }
        }
    }
    vlan {
        mtu 9216;
        unit 30 {
            family inet {
                mtu 1500;
                address 30.0.0.1/24;
            }
        }
        unit 130 {
            family inet {
                mtu 1500;
                address 130.0.0.1/24;
            }
        }
    }
}
protocols {

# you don't have to set igmp when pim is enabled on interface. This will automatically enable IGMPv2. 
    igmp {
        interface vlan.30;
        interface vlan.130;
    }
    pim {
        interface vlan.30 {
            mode dense;
        }
        interface vlan.130 {
            mode dense;
        }
    }
    igmp-snooping {
        vlan all {
            version 2;
        }
    }
}
vlans {
    v130 {
        vlan-id 130;
        l3-interface vlan.130;
    v30 {
        vlan-id 30;
        l3-interface vlan.30;
    }
}


Setting up a DUT switch

Sorry, you should have to set it by yourself. You only have to set one uplink - tagged port with vlan 30 and one downlink client port - untagged port with vlan 30 (port vlan id 30, untagged frames will be tagged to vlan 30. And also you could also set up IGMP snooping on vlan 30 with router port (uplink port) to test it.

Setting up a multicast receiver

Forcing IGMP version 2 on a receiver. Default version today is IGMPv3.
echo "2" > /proc/sys/net/ipv4/conf/eth0/force_igmp_version

Add ip address on untagged port on receiver connected to DUT switch, vlan 30:
ifconfig eth0 30.0.0.123/24
route add 224.0.0.0/4 via 30.0.0.1 dev eth0
apt-get install vlc

Run VLC and open stream on a receiver
menu Applicaton -> Sound & Video -> VLC media player
press CTRL+N (File -> Open Network Stream)
select protocol: UDP
set multicast address: udp://@238.1.1.30:1234

You should be able to ping Juniper from stream receiver. Run ping 30.0.0.1. They are L2-connected with vlan 30. And you also should be able to see your video.


A simple troubleshooting guide

  • Check cabling
  • observe blinking LEDs on switches and NICs
  • try to connect receiver directly to Juniper. Change Juniper config to be untagged interface or add vlan tagged interface to receiver.
  • use tcpdump on receiver and on streamer. Check for vlan tag (tcpdump -ni eth0 -e), destination and source IP and MAC
  • check IGMP snooping on DUT and Juniper
  • check IGMP packets on receiver: tcpdump -ni eth0 igmp
 

2/13/2013

LAB: Avaya Ethernet Routing Switch 5600 6.2.4 -> 6.2.5 upgrade


Please read documentation before upgrading your system.
We decided to upgrade from software version 6.2.4 to 6.2.5. It is going to be done with console access.
It is easy to upgrade, but you must know what to do with command download.

Firstly, you need a new software, an USB 2.0 flash with software on it or a TFTP server (tftp32, atftpd, ...). Then you have to realize that you have a correct version already running on your stacks:

# show boot

# show system verbose


So we have diagnostic image 6.0.0.15 which is already newest in time of writing this (2013-02-05). Switch runs firmware from primary 6.2.4. Firmware version 6.1.7 is set as secondary (there is a lot of difference between 6.1.7 and 6.2.4). Note - switch always boots primary. But you direct it to boot secondary with command "boot secondary".

Our situation is simplified, because we have two pure (not mixed with 5500) stacks forming a cluster.

We are going to "upgrade" secondary boot image first.
 # download address 10.255.253.3 primary image 5xxx_625027s.img no-res


Then. You can check status of upgrade observing switch port LEDs. Duration download and saving firmware to two-switch stack is between 4 and 5 minutes. Please read documentation for more information. After that you can see with # show boot, that there is no secondary image on primary Switch #1. This should be fine.

After booting new image
# boot
or
# reload force minutes-to-wait 1
new image will boot. But you have a problem. Secondary is still 6.1.7 and you want 6.2.4.

Here I noticed some kind of bug. Command:
# download address 10.255.253.3 secondary image 5xxx_624011s.img no-res
did not upgrade secondary image but primary. So I have again 6.2.4 as primary and 6.1.7 as secondary. (I tried this scenario multiple times with same starting situation even with restart after doing upgrade of secondary. )

After I put command  
# download address 10.255.253.3 secondary image 5xxx_624011s.img 
again (2nd time) it fortunately upgraded secondary. So for now we have 6.2.4 and 6.2.4. Now you can upgrade primary with new software
# download address 10.255.253.3 primary image 5xxx_625027s.img no-res
Here you should have 6.2.5 and 6.2.4 on primary and secondary installed.

I find some kind of helpful this command:
# toggle-next-boot-image
and
# boot secondary

End Note:
Boot image = software = firmware
Sometimes a diagnostic image is named firmware.

toggle-next-boot-image
Use this procedure to toggle the next boot image.
boot secondary
Use this procedure to use the secondary boot image.


Documentation: google for NN47200-500_06.02 or NN47200-500 Configuration System


11/09/2012

MIUI HTC Desire Z continuous restarting after start

MIUI HTC Desire Z problems

Read last note for quick resolution.

This is not very networking related blog. I installed custom ROM - MIUI czech - slovak version on my HTC Desire Z. You can search for official walkthrough.
After a week it was restarting continuously. Right after start. I tried remove sd card and also sim card. It was weird because it works only with both unplugged.
So I searched for something and found that this could be sd card related problem. I went to recovery mode - Turn off phone. Hold Power + Volume DOWN. FACTORY DEFAULT (Volume down, volume down middle button under your screen to go to clockworkmode). And than I tried factory reset, wipe data, wipe da..., wipe cache. And so on. Nothing helps. Maybe 10 restarts :-D.


What did NOT help?: In clockwork mode, go to advanced (scroll/swipe middle button and press it) and format sd card. I did 4gigs and 0 swap. And after restart, card was mounted and phone works. But it has only 4 G memory sd card, I restarted again to clockworkmod, mount usb cable. Format via windows to fat32 to 8gb. There are methods to format it as ext3 or ext4. There are some limitations with fat32. One of them is file size limit 4gb. But its ok for me.

What DID HELP? 
The only thing that works was returing to stock HTC. Download file from http://shipped-roms.com/index.php?category=android&model=Vision

I am from Slovakia so I used this one.
RUU_Vision_Gingerbread_S_HTC_WWE_2.42.405.3_Radio_12.56.60.25_26.10.04.03_M_release_224299_signed.exe
It is an easy walkthrough installation. Consider turning off antivirus during installation.


resoucrces:
http://forum.xda-developers.com/
http://shipped-roms.com